As winter comes to an end and the weather warms up, you may find dead trees or loose limbs around your property. When this happens, we encourage you to use it to your advantage by turning them into wood chips. Wood chips are a great product to use for landscaping as they limit the need for watering by reducing water evaporation.
What Is a Wood Chipper?
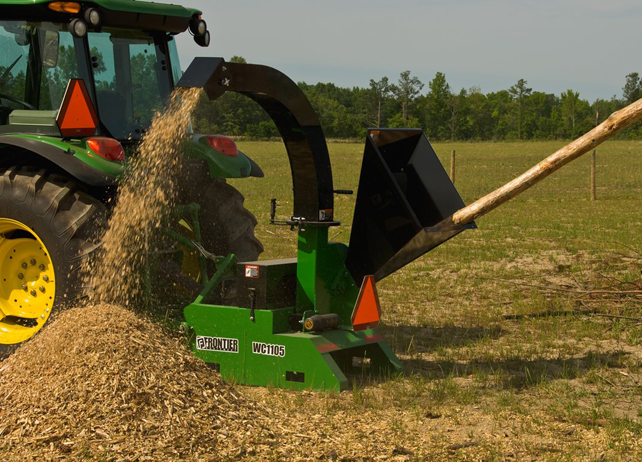
Now that we’ve highlighted the benefits of using wood chips, it’s time to explain how to create them: With a wood chipper. These pieces of machinery feature knives that essentially act as teeth to chew up logs, tree branches, and other types of lawn debris that home and landowners want to rid themselves of. Rather than having to bag up this debris and figure out where to put it, home and landowners can use a wood chipper to clean up their space while getting to reap the rewards instantly.
How to Use a Wood Chipper
For those who want to recycle the twigs, branches, or logs taking up space on their land, a wood chipper is a perfect option. However, before you can surface your property with wood chips, you must know how to use a wood chipper to get the job done.
Here are some steps to consider as you begin the wood chipping process.
1. Position on Level Ground
Before anything else, be sure your wood chipper is on level and solid ground to prevent movement or tipping during operation.
2. Adjust the Chip Deflector and Chip Chute
The chip deflector and chip chute allow you to control the distance and direction the chips are thrown. Most wood chippers have two clamp knobs on the deflector that can be adjusted to control the distance. Rotate the chip chute in any direction for the desired direction.
3. Set Parking Brake and Start the Chipper
Whether you’re using a tractor or other equipment to haul your chipper, be sure to activate the parking brake before turning on the machine. This will eliminate the chances of your hauling equipment moving during the chipping process.
4. Feed the Blunt End First
When feeding the wood chipper, start with the blunt end first as the material will feed through the machine easier and more consistently this way.
5. Feed Mixture of Dry and Green Limbs
As you collect your material to be put into the chipper, consider adding a mixture of dry and green limbs. The moisture that’s often found in green limbs will help to lubricate and cool the wood chipper’s knives as it’s running.
6. Stand Away from the Hopper
As you feed the branches in and the machine starts chipping, back away and off to the side to prevent debris from hitting you as pieces may eject.
7. Put the Wood Chips to Use
After you’ve finished chipping your debris, collect the wood chips and put them to good use!
Safety Tips for Wood Chipper Operation
It’s important to remember to always wear proper eye and ear protection, tight-fitting clothing, and work gloves when operating a wood chipper. Be sure to also read the complete operator’s manual before operating wood chippers or other types of equipment.
To learn more about how to use a wood chipper, visit this page or watch the video below.
If you have any questions about John Deere machinery, you can contact your local John Deere dealer.
If you enjoyed this post or want to read others, feel free to connect with us on Facebook, Pinterest, Twitter, or Instagram!