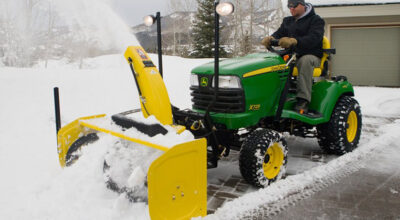
John Deere snowblowers are a popular attachment when it comes to winter cleanup. As it turns out, there are several snow attachments Deere enthusiasts can use with their existing machines to turn them into plowing implements during the winter. The John Deere 44-inch 100 Series Snow Blower is one option customers may want to consider for their machinery during this time of the year. It is as efficient as it is versatile and easy to use.
What is the John Deere 100 Series Snow Blower?
The John Deere 100 Series Snow Blower is a two-stage attachment created to fit 100 Series John Deere lawn tractors, excluding LA and D series models. The 100 Series Snowblower was built for residential use and helps users handle snow removal tasks around homes during winter.
What are the Key Features of a 100 Series Snow Blower?
The 100 Series Snow Blower comes equipped with a variety of features which makes it a versatile, easy-to-use, and efficient piece of equipment. Some key features include:
44-in. (112-cm) Snow Blower
The 44-in. width of this snow blower allows you to handle big snow removal jobs and clear a wider path in less time. It also provides consistent snow placement up to 50 ft (15.2 m) in variable snow conditions.
Two-Stage Design
Two-stage snow blowers use a combination of an auger and impeller to efficiently clear snow, making them more effective than single-stage snow throwers. With a two-stage design, the auger gathers and breaks up the snow while the impeller throws it away from the discharge chute.
Spout and Deflector
The 100 Series Snow Blower features a spout made from high-density polyethylene material, preventing it from denting or rusting over time. In addition, its discharge spout can be rotated 200 degrees from the operator station, which is conveniently located near the steering wheel for easy operation.
Premium Lift System
This lift system is designed to keep the snow blower housing level as it is lifted with the help of lift-assist springs, which aid in reducing lift effort.
Adjustable Skid Shoes
Skid shoes offer precise control over the height of the snow blower’s cutting edge, making them particularly beneficial for gravel driveways and uneven surfaces.
Installation and Storage
The 100 Series Snow Blower is made up of three major components, including the snow blower housing, front hitch assembly, and rear drive-sheave housing, which allows for easy snow blower setup and installation.
Let’s look over the key steps you need to take to install a John Deere 44-inch 100 Series Snow Blower and how it can help you with the task at hand.
How to Install the 44-Inch 100 Series John Deere Snow Blower
1) Before installing a John Deere snowblower attachment, recognize the safety information.
Before installing any John Deere snowblower attachment, take a moment to ensure you understand the signal words and prepare yourself to follow the instructions carefully.
2) Remove the mower deck and front bumper from your mower.
Follow the instructions in your operator’s manual for more information on how to remove these implements properly.
3) Install the front hitch.
First, find four carriage bolts and four nuts. Next, latch the front hitch mounting brackets over the top of the vehicle axle. Fasten the left bracket to the vehicle frame, and repeat for the right side. Tighten all four nuts when this step is complete.
4) Install the Belt Drive Module.
Position the belt drive module under the machine. Lift the module and latch the slats under the frame pin on each side. While holding the module, insert a carriage bolt to secure the module. Install the nut and repeat the process on the other side. Tighten the bolts accordingly.
5) Install the lift lock cable and PTO connection.
Rope the cable through the mounting slot and secure it with a spring pin. If you have a manual PTO model, put the short end of the engagement spring into the tension armhole, then put the cable through the hole on the belt drive module.
6) Line up the snowblower with the tractor to install the drive belt.
Remove the belt guide from the snowblower and route the drive belt around the pulley. Ensure that it is not twisted, then re-install the belt guide.
7) Install the snowblower housing to the tractor hitch.
Pull out both L-shaped pins and twist clockwise. Lower the front hitch so that the transport locking pin disengages. Lift the snowblower attachment to the hitch so that the yellow pins sit in the cradles. Rotate the L-pins counter-clockwise so that they lock into place. Verify that both L-shaped pins are fully engaged with the snowblower housing. Raise the snowblower to transport position so that the locking pin engages.
Where to Find John Deere 100 Series Snow Blower
Looking to tackle the winter clean up with John Deere 100 Series Snow Blower? Look no further than MachineFinder. Or if you have any questions about the John Deere 44-inch 100 Series Snowblower, you can contact your local John Deere dealer.
If you enjoyed this post or want to read others, feel free to connect with us on Facebook, Pinterest, Twitter, or Instagram!