As you mow around your house, business, or any other property with a John Deere mower, there’s a chance you may notice ridges forming where you have passed through. These ridges have likely formed because the mower deck may not be completely leveled.
Interested in learning more? Shop our inventory of used John Deere equipment!

How to Level a John Deere Zero-Turn Mower Deck
It is essential to level a John Deere Zero-Turn Mower Deck in order to get maximum use out of your machine as you work. Not everyone is used to the Quick Leveling Method, which makes necessary adjustments easier on the fly. Let’s look at how to level the deck on a zero-turn mower, so you are ready to tackle all of the challenges in your yard this year.

Leveling a Zero-Turn Mower Deck
- Recognize and read over the safety information so you can understand the safety signal words within the operator’s manual before you start.
- To level the mower deck, you need an 18-millimeter wrench, as well as a 15-millimeter wrench, a tire pressure gauge, and a deck-leveling gauge, which is provided to you in your mower storage compartment.
- Park the vehicle on flat ground, turn your engine off, and set down the parking brake.
- Take out the key and make sure to turn the caster wheels into a forward driving position.
- Disconnect the Z-Trak spark plugs.
- Make sure the front and rear tires are inflated to the necessary pressure. This can also be found in your operator’s manual.
- Insert the magnetic pin to a two-and-a-half-inch hole, and then lower the deck.
- Once the mower deck is adjusted at the two-and-a-half inch position for cutting height, it is now level and calibrated for any other cut height positions.
- Using the deck-leveling gauge, check the height between the ground and the deck rim at the adjusting point one. This gauge should then just slip under the deck’s rim.
- If adjustments are needed on the rear left deck’s rim area, you will want to turn the rear nuts clockwise and raise the mower deck. Turning it counterclockwise will lower the mower deck until the leveling gauge slips under the adjusting point.
- Repeat the procedure onto the rear right side of the deck to adjust point two. If a large adjustment (more than three millimeters or an eighth of an inch) is required, you will want to adjust both points alternately.
- Repeat these steps until you are satisfied with your mower deck’s level.
- In order to adjust the mower deck level, use the deck-leveling gauge to adjust the height between the ground and the front deck hanger bracket at the third adjusting point.
- The gauge will slip under the bracket. If adjustments are needed, try to loosen the lower nut on both sides of the deck.
- Beginning with the front left side, turn the top nut equally on both sides of the deck clockwise in order to raise the front of the mower. You will want to turn counterclockwise to lower the front of the mower so that the gauge just slips under.
- Then, tighten any of the lower nuts once the adjustment is complete.
- Check all four corners to make sure they have some tension before storing the gauge.
- Confirm the deck latches in the transport position. If it does not, you will want to return to the first and second adjusting points. Then, turn both of the rear adjusting nuts counterclockwise equally in order to lower the rear of the deck. You will want to then make sure that the deck latch engages.
- After this step, return the deck-leveling gauge to its stored position within the storage compartment.
- Reconnect your spark plugs, and you’re ready to go.
How to Level a John Deere X300 and X500 Mower Deck
Thankfully, leveling a mower deck on a John Deere X300 or X500 can be done in a short amount of time and as soon as the process is done, you can get back to cutting the grass just the way you want it to look. For the best results, the mower deck needs to be leveled from side to side and front to rear.
Here’s how to level a mower deck if you’re working with a John Deere X300, X500, or ZTrak™ mower.
To get started, you will need:
- Tire air pressure gauge
- Mower gauge
- Exact Adjust™ wrench
- 18-mm wrench
What to Do Before Leveling the Mower Deck
Before leveling a mower deck, park the machine on a hard and flat surface, shut the engine off, set the parking brake, and remove the key. Next, ensure the tractor’s tires are properly inflated (check the Operator’s Manual for ideal tire pressure numbers).
After this, raise the mower and place the mower cutting-height knob at the position identified for deck leveling. Lower the mower and verify that the mower wheels are not touching the ground (raise if necessary). Then, place the Exact Adjust gauge under the mower at the adjustment point near the left rear corner. If the mower does not make contact with the gauge, adjust the deck as needed.
Check the Mower Front to Back Level
Next, check the mower front to back level at the front adjustment point on the front left deck hanger bracket. If necessary, use the 18-mm wrench to loosen the rear nuts on each of the front lift rods, then turn the nuts equally on each side until the gauge slips under the front adjustment point.
Now, fully raise the mower and adjust the height control knob to the desired height, then lower the mower. Adjust the wheels so they’re at least 1/4 inch off the ground. The wheels will carry the mower deck over higher areas in the lawn to give it a smooth and even cut.
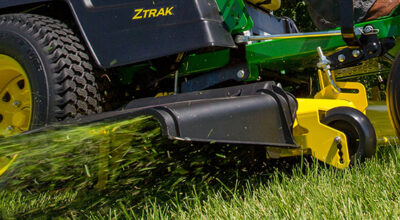
How to Level a John Deere ZTrak Mower Deck
With the machine parked, mount the mower and raise the deck into the transport position. With the deck in this position, be sure to inspect the mower blades for sharpness, damage, or signs of a bent blade. Each of these factors can impact the quality of the cut that your mower deck produces. Then, make sure the mower’s anti-scalp wheels are not in contact with the ground.
What to Do Before Leveling a John Deere ZTrak Mower Deck
To begin leveling the mower deck, lower it to 76 mm (3 in.). Next, position the right mower blade on the discharge side in the front to rear position. When the blades are in the correct position, measure the distance between the front blade tip to the ground. Using a leveling gauge, check the mower blade level. The front blade tip should be 76 mm or 3 inches, with a tolerance of +/- 2 mm.
After this is done, move to the other side of the machine and position the mower blade in the front to rear position. Measure the blade’s tip to ensure it is 76 mm as well.
If one side is lower than the other, loosen the jam nut on the adjustment rod and turn the rod tube as needed to bring the tip into the proper position. When completed, lock the jam nut to secure the setting. Re-check both sides of the deck after the adjustment has been made to ensure it’s within specification.
Now, it’s time to check the deck’s front-to-rear measurement. With the deck still in the 3-inch cutting height, position the right mower blade in the front to rear position. Use the leveling gauge to measure from the right front blade tip to the ground. Turn the blade 180 degrees and measure from the right rear blade tip to the ground. The height of the rear blade tip should be between 3-6 mm higher than the front blade tip. If this is not the case, make the necessary adjustments.
Final Thoughts
With a level mower deck, you will be able to mow with confidence and eliminate uneven cuts. If you have any questions about how to level a mower deck, or you’re looking for mowing equipment to add to your fleet, contact your local John Deere dealer.
If you enjoyed this post or want to read others, feel free to connect with us on Facebook, Pinterest, Twitter, or Instagram!